
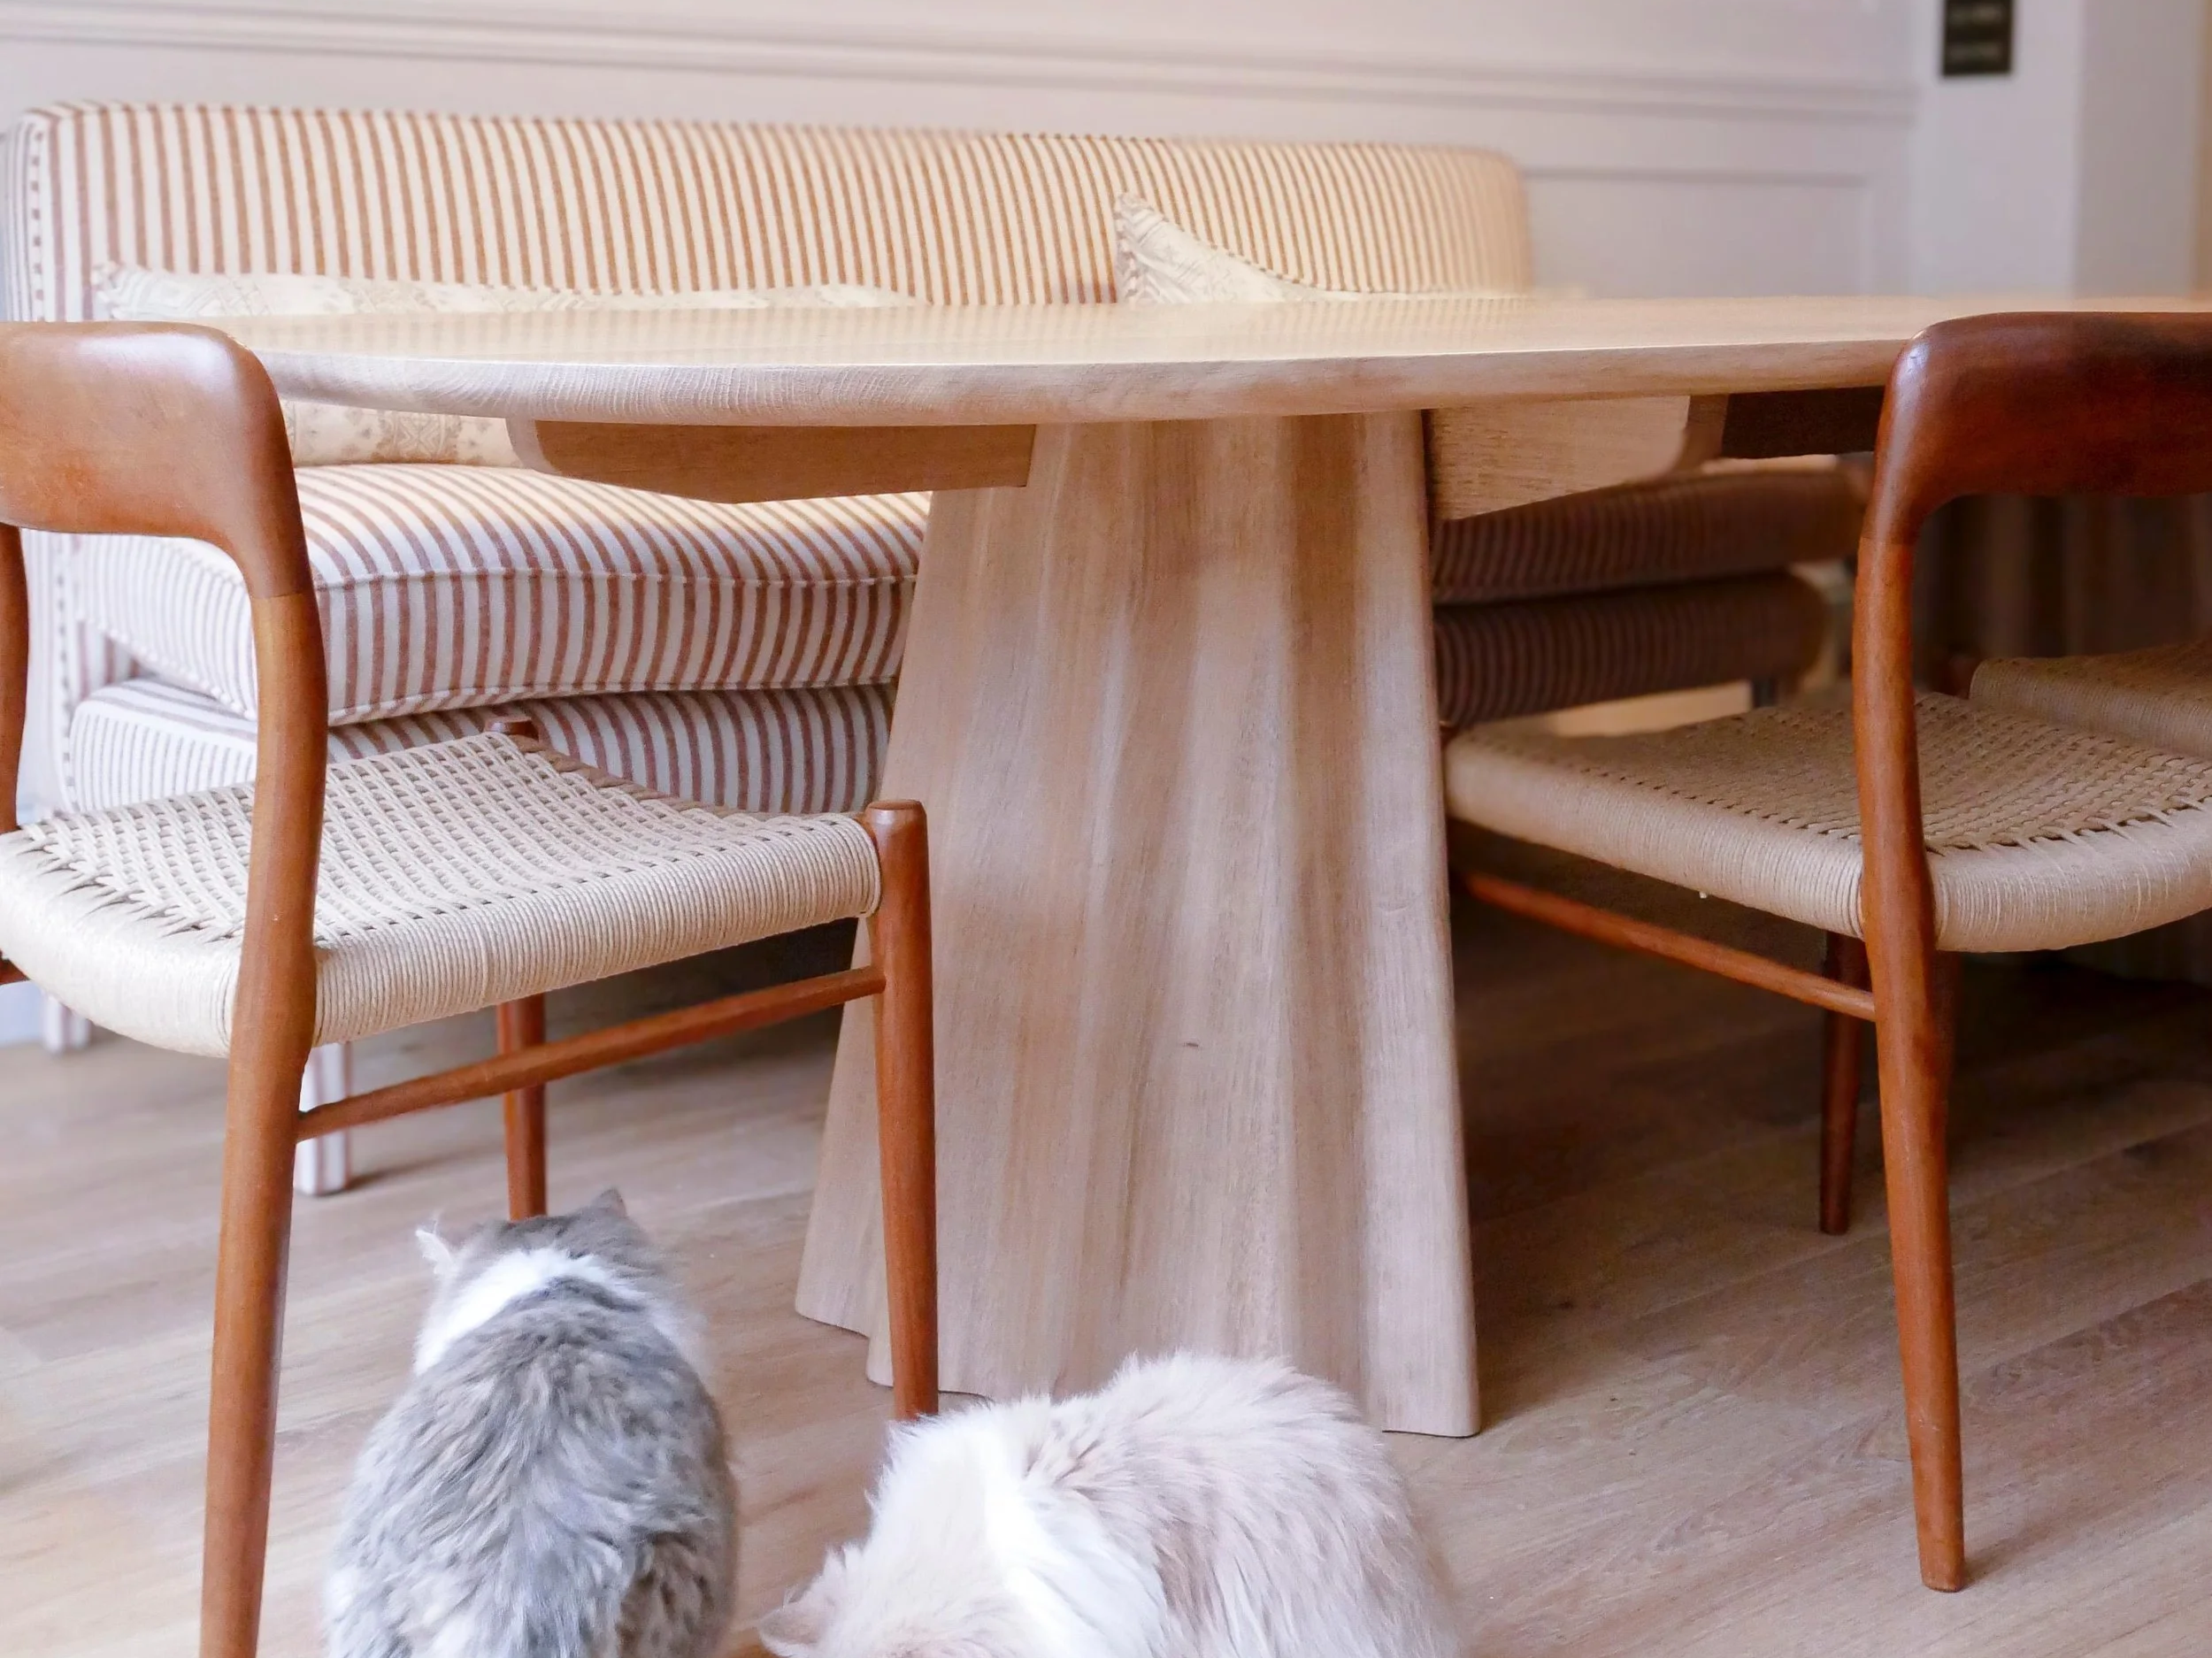
Building a Bespoke Oak Dining Table - From Timber Yard to Delivery Day
Every commission tells its own story from tree that once stood to the home it will reside in. This one begins at a timber yard near the south coast and ends on in client's dining room in Chiswick, West London - a bespoke oak dining table, nearly three metres long, with carved pedestal bases and a raw oak finish. Here's how it came to life, step by step, from selecting the boards to delivery day.
I - Selecting the Boards at the Timber Yard
For many craftspeople, a new project starts at the workbench or in the machine shop. For me, it all begins at the timber yard. I've never started a client commission without handpicking the timber boards myself, and I'm not planning on changing this. A coherent design can be undermined by an indiscriminate choice of timber, so it's just not a risk worth taking.
If you're buying veneered panels, it's possible to get near-identical colour, tone and pattern throughout an entire project. For solid timber, it simply isn't that straightforward. Solid timber can show huge variation between different boards from the same supplier, even from the same tree. One of the many reasons I don't use imported timber is that it's often supplied in mixed packs - the boards may come graded to the same thickness, length and width, but they can come from different trees, in different forests, in different countries entirely.
If I'm sourcing for a new commission, I want to be certain that all of the boards come from the same tree. Often this means sequential boards as the log is milled, but sometimes I'll be looking for different characteristics for different components in the build. I may want the components quarter sawn - this affects both the dimensional stability of the timber and its appearance (for example, medullary rays showing in oak, or the lacewood effect in London plane).
On occasion I've taken clients with me to the timber yard - not only a good opportunity to show what the commission may look like at an early stage, but also to give them an insight into the timber that will be coming into their home: where the tree stood, how old it was, why it was felled.
II - Laying Out Each Component on Individual Boards
Laying out the individual timber components for a new commission is one of the most consequential processes in furniture making, yet it's treated by some as an afterthought. Done well, it's unlikely anyone will ever notice. Done poorly, it can undermine months of work and ruin the composition of the piece.
There are competing forces at play. Economy - how do I get the parts I need with as little wastage as possible, avoiding knots, shakes, sapwood and other nasties that may show through in the final piece. But timber tone and grain often change dramatically from one end of a board to the other, or from side to side. Grain orientation plays a huge role in strength, appearance and dimensional stability. The parts also need to be chosen in a way that promotes balance and symmetry in the finished piece, while maximising the mechanical properties of the timber.
I think most clients would be astonished to know how long I spend laying out parts. For a 4-board tabletop, there are over 6,000 permutations for arranging the timber. Some rule themselves out quickly - too much change in coloration at the join, too little consideration given to how a board might cup - but even once the order of the boards is decided, we're only down to 256 combinations. This is where I spend a lot of time: spinning a board end for end, flipping it face for face, rearrange, rinse, repeat. There's no such thing as perfect, but I'm finally getting quite good at knowing when the music should stop and the boards have found their position.
The same process holds true across every type of furniture I make - the legs of a table, the centre panels of a cabinet. There are always choices and trade-offs. And if you, as a client, never notice - that's okay. It means I've done my job.
III - Solid Joinery Required for the Dining Table Base
With the timber chosen and its layout resolved, it was time to start the joinery for this table's two pedestal bases.
Each base is made up of six identical (bar the profiling of the outside edges) tapering trapezoid staves. Given the scale of the table, the staves were laminated up from 2" boards, giving a total thickness of over 90mm - maximising the saw blade height of our Altendorf saw in the workshop.
Each stave tapers on a compound angle. In these circumstances, it's worth spending a little extra time to make sure the joinery can be perfect first time. I built several jigs to hold each blank correctly - the skew of the jig accounted for the taper along its length, and the tilt of the saw blade cut the bevel so each blank mates perfectly with its neighbour. A vice-tight jig and a newly sharpened rip blade meant the surfaces were good enough to glue straight off the saw - a massive relief, since hand or machine planing at this stage would almost certainly introduce inaccuracies and compromise strength.
Since both the inside and outside faces would later receive a profiled finish, I machined a shallow groove into each glue face. This adds nothing structurally - with this much face grain to face grain contact, no extra strength is needed. Instead, the grooves locate each stave precisely against its neighbour, meaning minimal clean-up once the profiled components are glued together.
The resulting structure resembles a wigwam: wide at the base, tapering to a near point at the top. Because of the design, the radii of the curves on the inside and outside of each profile change as you move along the length of the staves - too complex to carve by hand, so the profiles were CNC-machined for perfect repetition.
IV - Shaping the Intricate Pedestal Curves
To create the rippled, wave-like texture across each pedestal's curved faces, every stave was CNC-machined on both sides. This raised challenges for work-holding and indexing, to make sure both carved faces would meet as intended. Using the original CAD model, we machined mating jigs from MDF. Once the first side was carved, each blank could be flipped onto its mating jig - MDF being porous enough for the CNC's vacuum table to hold the part firmly without screws, so the whole surface could be carved without obstruction.
Once fully carved, the staves were glued up in pairs to keep the process manageable. The first pairs were straightforward, since the centre of the glue line coincided with the outer edges, where clamping pressure could be applied directly. Each subsequent glue-up grew more complicated as the centre of the glued faces moved further from any point where clamping pressure could reach.
CNC machines are fantastic for fast, accurate milling, but they have two real shortcomings for high-end bespoke furniture. First, they have no concept of grain - they were built for homogenous materials like steel, aluminium and polymers, whereas the direction you machine timber has a huge impact on the finish. Second, when machining rolling curves like these, the stepover of the cutter head leaves small ridges that need removing. A sander can't reach into all the nooks and crannies here, so a well-tuned card scraper - several, in different shapes - does the job perfectly.
V - Hand Tool Work to Finish the Pedestal Edges
Once the full pedestal base was glued up, it was time to add the edge detailing to each outside edge. Since these were milled identically to the inside staves, I needed to transform a sharply angled surface into a smooth roundover. As the timber's thickness increases from top to bottom of the design, the simplest approach is to mark the desired profile onto the end grain at both ends and take to the hand tools.
Once marked out, I added a series of tangential lines representing the 45-degree chamfers that could be safely removed without spoiling the profile. I repeated the process at 22.5 and 67.5 degrees and flattened these too, leaving a tapering octagonal shape. Removing the high points gave a roughed-out, fully round form. From there, refinement is mostly done by touch - feeling for small ridges and removing them by hand. A long strip of sandpaper finishes the job with a perfectly smooth transition.
For most of this, a block plane was the best tool. Its adjustable mouth and fine blade adjustment let me control the depth of cut and avoid any tearout. A few concave sections needed a curved spokeshave, and some very tight corners at the top of the pedestal called for the fine touch of a sloyd knife.
VI - Constructing a Robust Table Base
This is one of my favourite stages of any bespoke creation. Until now, the design has existed as sketches on paper and sterile 3D renders - then as a collection of unconnected components waiting to be joined together and given meaning. It's also one of the most stressful stages: the care and skill invested in each part builds throughout the process, and one wrong step here can mean remaking parts or fixing real damage.
Once fully shaped, each pedestal needed levelling so it sits stably on the floor and fully supports the tabletop once in place. My low-angle jack plane doesn't see much use, but it's ideal here - the low angle of attack gives a perfect finish on end grain oak. Chamfering the edges first, and skewing the blade, protects against tearout at the corners.
The under-frame is a simple H shape, but the strength of the connections is vital. At nearly 3m long, the tabletop needs full support without flexing, and the pedestals need to be held tight to prevent the frame racking. I used one of the strongest joints available - a shouldered cross-halving joint. A simple halving joint substantially weakens each component and can look unsightly if not cut perfectly; it also offers no resistance to twisting. The shouldered, housed version increases joint strength many times over.
VII - Crafting the Table Top Surface
With the frame complete, attention turned to the tabletop. The boards were chosen at the timber yard for their dimensional stability and grain match, and were still in boule - meaning that, stacked together, they still formed the shape of the unsawn trunk, layered in sequence. The central board (the one containing the pith at the centre of the tree) was rejected for excessive splitting, and the first board on either side of it was chosen for the top - still showing some splits, very common in central boards, but with grain that's almost perfectly quarter sawn, giving a pleasing pattern and very little predilection to cup once flattened.
The unstable central section of each board was removed, leaving four planks to make a 1.2m-wide top. As with every other component on this table, there were countless ways to arrange them, so I spent a good deal of time flipping and rotating the boards until the joins would all but disappear.
Once glued up, the top was left to set vertically so it wouldn't sag under its own weight - this also made it easy to spot any gaps between the clamps and the surface, guaranteeing a completely flat top once released.
The top was scraped to remove tiny areas of breakout from the thicknesser, then sanded to a uniform texture. The shape was cut on the CNC - a template router could have managed the outline, but the large rounded undercut specified in the design didn't exist as an off-the-shelf cutter, and manoeuvring the tabletop around a spindle moulder cutter by hand would have needed several people and very steady hands to get a clean result. The CNC let me cut the outline and the profile in a single process.
VIII - Final Assembly of the Dining Table
The final countdown - the home straight, squeaky bum time. I've been making bespoke furniture for a while now, but it never ceases to catch me off guard quite how late in the process you find out whether the design truly works. I've modelled it in CAD and subjected it to point loads and distributed weights, analysing deflection under load. I've 3D-printed it in miniature to check the proportions in true 3D. But it's only at this stage that a maker gets a definitive thumbs up that all the work - at the drawing board, on the computer, and at the bench - has paid off.
For this design, the two pedestal bases bolt through to the under-frame with stainless steel fixings - necessary to keep delivery manageable, since each pedestal was particularly weighty. Loose tenons mean that once the bolts are tightened, the structure becomes completely rigid, with the fixings hidden beneath the tabletop.
Look closely and you'll spot small bolts protruding from the top of the frame. These locate into keyhole slots in the underside of the tabletop. Once the top is in place, a simple tap of a mallet seats the bolt heads into the keyholes, holding everything flat. Bolts are then added along the centreline - where no allowance for seasonal movement is needed - locking the whole structure into place.
And finally, a chance to prove the calculations were right, and the table won't flex even under my considerable weight: there's no better test than climbing on the piece you've just spent weeks making.
IX - The Final Step - Delivery Day
Delivery day is a big one for any maker, though hopefully any client will be blissfully unaware. There's a lot to manage behind the scenes - booking the van, wrapping and protecting every edge and surface, making sure the piece will fit through doorways and up stairs. All of that happens quietly, so that when I arrive, the only thing my client needs to think about is appreciating their new piece of furniture.
I make every commission to the client's brief, involving them as much as they'd like along the way - sometimes a little, sometimes with visits to the workshop or timber yard - and by delivery day they've signed off on every detail. It's been pored over in the abstract, down to the last drawing, 3D render, finish sample and 3D print. But there's a completeness to bespoke furniture that only arrives once a piece slots into its home, where it all just makes sense.
So when I get to see a client's face light up as I deliver or install a piece, it makes everything worthwhile - every hour in the workshop, every ache, bruise and splinter, every time the timber insisted on resisting my efforts. It's why I get out of bed and head to the workshop every morning. In this particular case, my client couldn't have been more delightful. She even laid the table so we could get some photos of it in use - and doesn't it look glorious.